

I love the look of family photos printed on canvas, but I never knew I could make them at home! After transferring photos to fabric, I was super excited to try some pieces using stretched canvas. I hope this inspires some of you to make something special for your home...
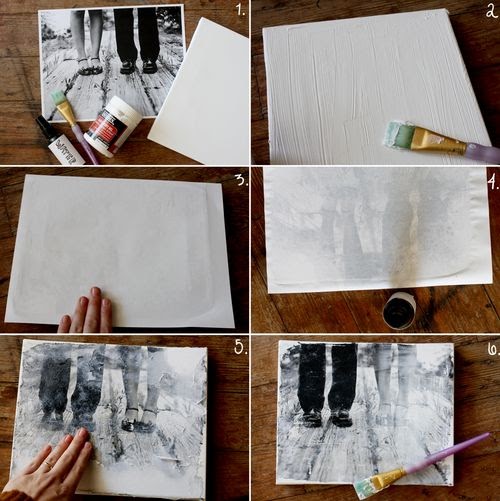
Here's how I transferred my photo to canvas: 1. Supplies needed- stretched canvas (I chose an 8x10 size), gel medium (I used this kind from Liquidex ), paint brush & the image you want to transfer (laser copy) & a spray bottle filled with water. Remember, your image will print reversed. 2. Completely cover your canvas with gel medium. Use a heavy coat. 3. Press the photo copy onto the canvas & let it dry for several hours or overnight. 4. After your image is completely dry, use a spray bottle to wet the top of the paper. 5. Rub the surface with your fingers until pieces of the paper start coming off. When pieces start coming up your image will be revealed. This step takes patience & is messy! Be careful not to rub too hard as this can remove your transfer on accident. Continue until all the paper is removed and the image is completely visible! 6. Cover your canvas with one more coat of gel medium to seal and protect the image.
Note: You can expect an imperfect transfer. I think the imperfections are absolutely lovely! It's best to choose an image that is not incredibly detailed to work with. Each transfer is different. The more you experiment, the better!
I'm so excited to make these little keepsakes for our home. These would also make amazing gifts! I can't wait to make more. xo. Ariel Shay
No comments:
Post a Comment