9.11.11

Music must hear... Washed Out

Washed Out is Ernest Greene, a young guy from Georgia who makes bedroom synthpop that sounds blurred & woozily evocative, like someone smeared Vaseline all over an early OMD demo tape, then stayed up all night trying to recreate what they heard.

28 year old Atlanta based songwriter & producer Ernest Greene, AKA Washed Out, first came to prominence in the summer of 2009 after unassumingly posting a handful of bedroom recorded tracks to his Myspace page from his family home in the seclusion of the tiny rural city of Perry, Georgia. “I’d been writing music on my own for three or four years previous to that, mostly as a way to experiment with songwriting processes. Those were just the first I ever shared.”


Songs such as “Belong” & “Feel It All Around”, Greene’s biggest hits to date, artfully match the glossy melody of ’80s synth pop, the widescreen scope of early ’90s Balearic dance music & the slowed, heavy bounce of southern Hip Hop production to gorgeously wistful vocals with results as undeniably idiosyncratic & original.


If that sounds incredibly unique to you, that's because it is. Washed Out is a new breed of music with other artists such as Toro Y Moi, Small Black, Neon Indian, Delorean, Real Estate, Beach House, Gold Panda, Air France, & so many more.

I hope you all take the time to listen to the amazing sounds of these bands & enjoy the same musical bliss that I do while listening to them.

xo. Ariel Shay

Washed Out - "Feel It All Around"

4.11.11

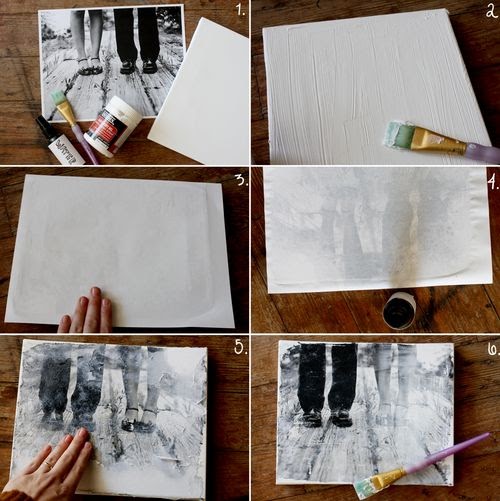
Want to make your own canvas portrait?


I love the look of family photos printed on canvas, but I never knew I could make them at home! After transferring photos to fabric, I was super excited to try some pieces using stretched canvas. I hope this inspires some of you to make something special for your home...


Here's how I transferred my photo to canvas: 1. Supplies needed- stretched canvas (I chose an 8x10 size), gel medium (I used this kind from Liquidex), paint brush & the image you want to transfer (laser copy) & a spray bottle filled with water. Remember, your image will print reversed. 2. Completely cover your canvas with gel medium. Use a heavy coat. 3. Press the photo copy onto the canvas & let it dry for several hours or overnight. 4. After your image is completely dry, use a spray bottle to wet the top of the paper. 5. Rub the surface with your fingers until pieces of the paper start coming off. When pieces start coming up your image will be revealed. This step takes patience & is messy! Be careful not to rub too hard as this can remove your transfer on accident. Continue until all the paper is removed and the image is completely visible! 6. Cover your canvas with one more coat of gel medium to seal and protect the image.
Note: You can expect an imperfect transfer. I think the imperfections are absolutely lovely! It's best to choose an image that is not incredibly detailed to work with. Each transfer is different. The more you experiment, the better!


I'm so excited to make these little keepsakes for our home. These would also make amazing gifts! I can't wait to make more. xo. Ariel Shay

Jewlery box & shelf D.I.Y. Craft


Try this cute jewelry box with lumberjack flannel or soft floral fabric for a different look. A cute crafty piece like this can be made to tie into almost any room! 


Supplies needed: wooden crate, cork tile, fabric, tape measure, scissors, hot glue gun, cup hooks, T-pins, sawtooth hangers.


If painting or staining your crate, do this beforehand to allow it time to dry thoroughly. These crates can often be found in antique & thrift stores, but you can also get them in various sizes at craft stores.
Step 1. Measure out the inside of the crate, & cut the cork to fit inside the bottom.


Step 2. Cut a square of fabric about an inch or so longer than the cork on each side, fold the edges back and secure with hot glue. 


Step 3. Place your cork tile into the bottom of the crate. It should fit snugly! You can use a little hot glue on the bottom of your crate if the tile wiggles too much.


Step 4. Screw in a couple of cup hooks on each side. These are best for holding longer necklaces that may not fit inside the crate.


Step 5. Nail a couple of sawtooth hangers for hanging. (If your crate is on the heavier side, some sturdier hardware may be needed. I've found these work just fine.) Step 6. Hang your crate, then stick T-pins in the cork to hang necklaces, bracelets, rings, etc. This is a functional yet eye-pleasing way to display all your favorite jewelry!


I love this project because it's cute, simple & functional! It's the perfect piece for a bedroom or bathroom... wherever you get ready each morning. Have fun making something pretty for your space! xo. Ariel Shay