9.11.11

Music must hear... Washed Out

Washed Out is Ernest Greene, a young guy from Georgia who makes bedroom synthpop that sounds blurred & woozily evocative, like someone smeared Vaseline all over an early OMD demo tape, then stayed up all night trying to recreate what they heard.

28 year old Atlanta based songwriter & producer Ernest Greene, AKA Washed Out, first came to prominence in the summer of 2009 after unassumingly posting a handful of bedroom recorded tracks to his Myspace page from his family home in the seclusion of the tiny rural city of Perry, Georgia. “I’d been writing music on my own for three or four years previous to that, mostly as a way to experiment with songwriting processes. Those were just the first I ever shared.”


Songs such as “Belong” & “Feel It All Around”, Greene’s biggest hits to date, artfully match the glossy melody of ’80s synth pop, the widescreen scope of early ’90s Balearic dance music & the slowed, heavy bounce of southern Hip Hop production to gorgeously wistful vocals with results as undeniably idiosyncratic & original.


If that sounds incredibly unique to you, that's because it is. Washed Out is a new breed of music with other artists such as Toro Y Moi, Small Black, Neon Indian, Delorean, Real Estate, Beach House, Gold Panda, Air France, & so many more.

I hope you all take the time to listen to the amazing sounds of these bands & enjoy the same musical bliss that I do while listening to them.

xo. Ariel Shay

Washed Out - "Feel It All Around"

4.11.11

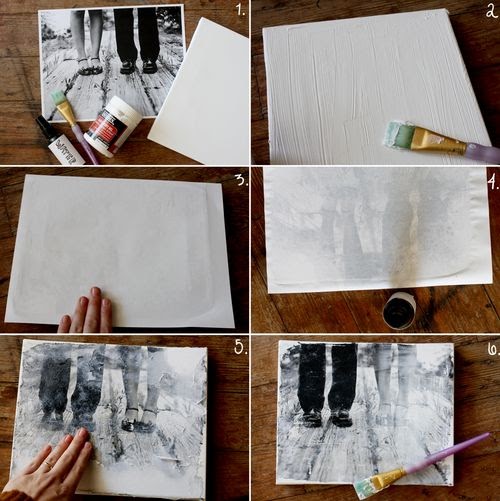
Want to make your own canvas portrait?


I love the look of family photos printed on canvas, but I never knew I could make them at home! After transferring photos to fabric, I was super excited to try some pieces using stretched canvas. I hope this inspires some of you to make something special for your home...


Here's how I transferred my photo to canvas: 1. Supplies needed- stretched canvas (I chose an 8x10 size), gel medium (I used this kind from Liquidex), paint brush & the image you want to transfer (laser copy) & a spray bottle filled with water. Remember, your image will print reversed. 2. Completely cover your canvas with gel medium. Use a heavy coat. 3. Press the photo copy onto the canvas & let it dry for several hours or overnight. 4. After your image is completely dry, use a spray bottle to wet the top of the paper. 5. Rub the surface with your fingers until pieces of the paper start coming off. When pieces start coming up your image will be revealed. This step takes patience & is messy! Be careful not to rub too hard as this can remove your transfer on accident. Continue until all the paper is removed and the image is completely visible! 6. Cover your canvas with one more coat of gel medium to seal and protect the image.
Note: You can expect an imperfect transfer. I think the imperfections are absolutely lovely! It's best to choose an image that is not incredibly detailed to work with. Each transfer is different. The more you experiment, the better!


I'm so excited to make these little keepsakes for our home. These would also make amazing gifts! I can't wait to make more. xo. Ariel Shay

Jewlery box & shelf D.I.Y. Craft


Try this cute jewelry box with lumberjack flannel or soft floral fabric for a different look. A cute crafty piece like this can be made to tie into almost any room! 


Supplies needed: wooden crate, cork tile, fabric, tape measure, scissors, hot glue gun, cup hooks, T-pins, sawtooth hangers.


If painting or staining your crate, do this beforehand to allow it time to dry thoroughly. These crates can often be found in antique & thrift stores, but you can also get them in various sizes at craft stores.
Step 1. Measure out the inside of the crate, & cut the cork to fit inside the bottom.


Step 2. Cut a square of fabric about an inch or so longer than the cork on each side, fold the edges back and secure with hot glue. 


Step 3. Place your cork tile into the bottom of the crate. It should fit snugly! You can use a little hot glue on the bottom of your crate if the tile wiggles too much.


Step 4. Screw in a couple of cup hooks on each side. These are best for holding longer necklaces that may not fit inside the crate.


Step 5. Nail a couple of sawtooth hangers for hanging. (If your crate is on the heavier side, some sturdier hardware may be needed. I've found these work just fine.) Step 6. Hang your crate, then stick T-pins in the cork to hang necklaces, bracelets, rings, etc. This is a functional yet eye-pleasing way to display all your favorite jewelry!


I love this project because it's cute, simple & functional! It's the perfect piece for a bedroom or bathroom... wherever you get ready each morning. Have fun making something pretty for your space! xo. Ariel Shay

15.10.11

Danger Kitty Fashions - Best place to get your costumes this Halloween

If you want to find the cutest costumes for Halloween this year, Danger Kitty Fashions is defiantly the place to shop. They have everything you could possibly be looking for. Whether you want cute, sexy, or pretty they have it! These new costumes for this season are absolutely stunning. I can promise you that you wont see these any where else! 

These Alice in Wonderland costumes blew my mind! I've seen hundreds of Alice in Wonderland costumes through out the years, but nothing like these. Danger Kitty Fashions has all your favorite Wonderland characters, even the Cheshire Cat (also with blue stripes like the one in Tim Burton's Alice movie)! Now really, where else have you seen that?
I thought these animal costumes were just the cutest! Danger Kitty Fashions has The Big Bad Wolf, an adorable raccoon, The Brave Lion, & so much more including cute kitties, a skunk, rubber ducky, bumble bee, leopard, Hello Kitty, a husky dog, & so many more cute critters! Oh & of course can't forget the gangster hamsters from the Kia Soul car commercials, can you believe that?! haha.


We all see the the typical pirate costumes every year that are worn & seen over & again, but have you ever seen these before? I couldn't get over how stunningly beautiful & detailed they were. With these pirate costumes everyone will be trying the steal your booty! Argghhhh!
These were 4 of my personal favorites from the website. The indian girl is my absolute favorite costume ever! I want it so bad! Those boots are the most adorable thing. The flapper & hippie girls were also just cute as a button. If you're like me you'll really love that these costumes are sexy & cute, but not too revealing. I always have a hard time finding costumes that don't show too much skin & aren't silly looking like the adult costumes you find at Walmart.

I had to add in the sweet Little Red Riding hood to go with The Big Bad Wolf above. Can't have Little Red Riding hood with out The Big bad Wolf!
For those of you who didn't know, Danger Kitty Fashions is an online store that is owned by my wonderful parents. I can promise you my enthusiasm for these products is not just because they are from my family's store, but because they are really that outstanding. I hope you all take a look at the site & hopefully find something you love. You would be getting an amazing costume & also helping my amazing family out!

Danger Kitty Fashions also has accessories, wigs, shoes, corsets, plus sizes, formal gowns, mini dresses, swim wear, lingerie, honeymoon & bridal wear, & dance/club wear. Not to mention an amazing selection!
Blue Cheshire Cat from Tim Burton's Alice
Costumes can get a bit pricey right? That's why Danger Kitty Fashions & Toast & the Teaspoon Factory has teamed up to give you a special Halloween discount for 15% off your purchase! If you follow T&TF or recommend it to 2 friends you will be sent a discount code to enter when you are in the process of checking your order out! Leave a comment to this post to let me known when you've done either or send a message to my facebook.

Happy Halloween everyone! xo. Ariel Shay


P.S. My mother has a disease called Lupus which makes it almost impossible for most people with this disease to live regular lives like they wish they could. It is very painful & in a lot of cases deadly. My mother runs this website nearly on her own. It is a miracle how she is able to pull herself out of bed everyday & almost all the time have a smile on her face & be loving. She is the best mother in the world & the strongest, most beautiful person I know. I aspire to be as strong & loving as she has always been. Buying products from her store helps more than you could imagine. She works very hard for her store & I know would appreciate your business greatly. I mainly wanted to write this just to give my amazing mom credit for all her hard work. I hope everyone else will visit the site & see all the hard work she has put in to it to =] Thank you.

4.10.11

Birdie Fringe Purse DIY Craft


I love statement pieces, especially accessories! I saw this pretty bird fringe purse & thought it was perfect because I wanted something special to wear this Autumn. This pretty project only takes about two hours to create. I hope you enjoy it...

  
Here's how to make them.... Supplies Needed: Enough leather (or faux leather) to cut your bird shape (x2), strap & fringe, a small scrap of lace, one black button appx. 1 inch across, scissors, two colors of yarn, paper, a sharpie & a Crop-A-Dile tool. 

Step 1: Draft a quick pattern on paper for your bird shape. It can be as large of tiny as you like. This one is about 8 inches wide. Step 2: Trace your pattern onto the back of one piece of leather. Flip the pattern to trace your second side. You should have two bird shapes that match up when the insides are touching. Step 3: Cut all the other pieces you want. I only added details to one side of my bird, so he has one eye, one wing and two sides for his tail (because it's sewn on from both sides). Draft patterns on paper and trace them if you are nervous to cut into your leather. Step 4: Use your Crop-A-Dile tool to punch holes in the leather for the wings. Step 5-8: Use a sharpie to create a template on paper for how wide you want your fringe to be. After you have that part of the pattern you can cut the leather shape for your fringe and start fringing it with scissors. Look closely at the photos to see how to do this. Step 9: Glue lace (eye) on your bird. Allow to dry and then stitch on the button. Next, stitch the wings on. It's always smart to finish all the the detail work on a handbag before sewing it together. Step 10: Punch holes for the exterior of the bag. These should surround the entire bag except for the top. 


Step 11: Punch any holes needed on your fringe to sew through. It's extremely hard to sew through leather by hand, so try to punch a hole in every spot that you anticipate stitching. Step 12: Put your pattern pieces together, make any last minute tweaks you need to before stitching. Step 13-14: Stitch the two purse pieces together all the way around the bird. Make sure the fringe pieces get caught in your stitches & are secured. Step 15: When you have stitched around the entire bird, go backwards to add another decorative stitch. (see photo) Step 16-18: Attach tail. I did this step last and I think it created a nice clean look. Step 19-20: Create and attach a simple strap. Measure the strap on your body to be sure you find the perfect length that is comfortable for you. That's all... Have fun stitching this fun and easy birdie purse!


You can easily make a strap with two long strips of leather, lots of punches & yarn. I love the look of the added hand stitches. A simpler solution would be just one long strip of leather (ReStyle a skinny belt?).
 
A few thoughts about working with leather: I have been working with leather (and faux leather) for just a short time. I've found that most shops sell scraps at a sweet discount! I also use vintage that is heavily damaged for fabric. If you can't afford real leather (it can be a little pricey) you can purchase a vinyl jacket or bag from the 1970s at a thrift shop for a few bucks. That's a budget friendly (& vegan) option!

xo. Ariel Shay